
Your kitchen might look clean on the surface, the benchtops are wiped, the dishes are done, and everything’s more or less where it should be. But if you’ve ever pulled out the rangehood filter or looked behind the oven, you already know there’s a difference between tidy and deep cleaning.
As professional kitchen cleaners, we see this gap every day. Grease, grime, and food residue build up in places most people don’t think to check – and over time, it goes from a small job to a big one.
This guide breaks down exactly how to deep clean every part of your kitchen, zone by zone. We’ve included the same techniques our Vacmate team uses on the job, along with the kitchen cleaning tips that make the biggest difference when you’re doing it yourself.
How Often Should You Deep Clean Your Kitchen?
A proper deep clean every three to four months will keep most kitchens in great shape. That said, some areas need more frequent attention than others.
Here’s a quick breakdown of how long each zone typically takes and how often it should be tackled:
| Kitchen Zone | Estimated Time | Recommended Frequency | Difficulty |
| Oven (interior, racks, door) | 45–60 min | Every 2–3 months | Hard |
| Rangehood and filters | 20–30 min | Every 2–3 months | Medium |
| Fridge (interior and exterior) | 30–40 min | Every 2–3 months | Easy–Medium |
| Benchtops and splashback | 15–20 min | Weekly (deep clean monthly) | Easy |
| Sink and tapware | 10–15 min | Weekly (deep clean monthly) | Easy |
| Cupboard tops and kickboards | 15–20 min | Every 3–4 months | Easy |
| Dishwasher | 15–20 min | Monthly | Easy |
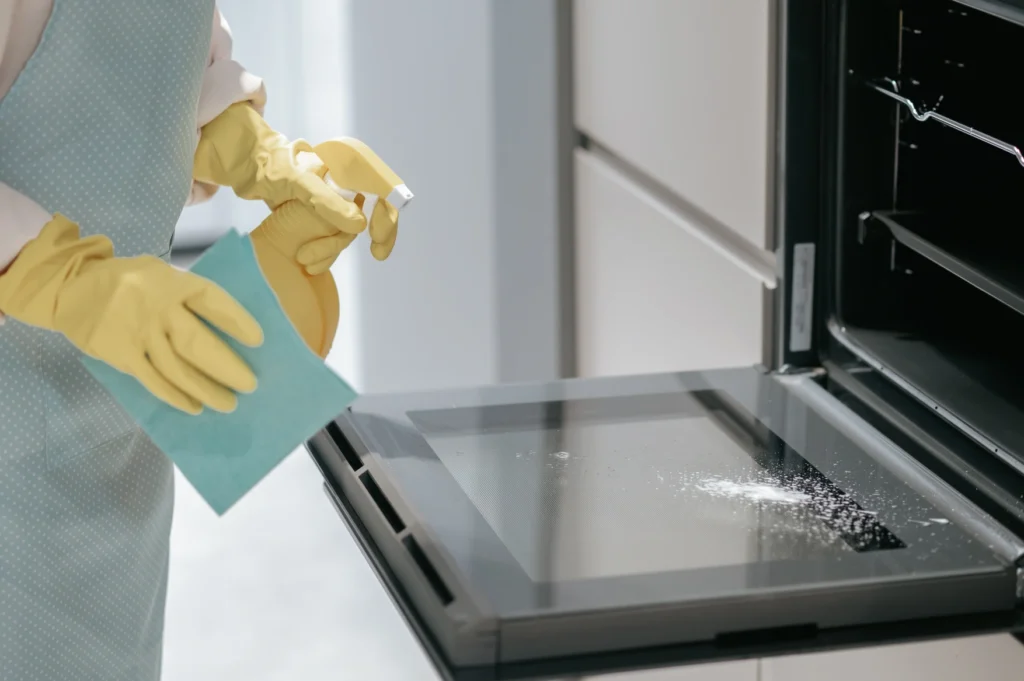
How to Deep Clean Your Oven
If there’s one appliance that gets skipped during a regular kitchen clean, it’s the oven.
And we get it, it’s not a fun job. But baked-on grease and carbon build-up (those tough black spots) don’t just look bad. They can smoke when you cook, affect the taste of your food, and become a genuine fire risk over time.
Here’s how our team handles professional kitchen cleaning for ovens:
- Start with the racks. Remove them and soak them in hot water with a generous squirt of dish soap. If the build-up is heavy, add half a cup of baking soda to the water. Let them soak for at least 30 minutes (the longer, the better) while you tackle the interior.
- Spray the inside. Use a quality oven cleaner or a paste made from baking soda and water. Apply it generously across the interior walls, floor, ceiling, and door – avoiding the heating element if it’s exposed. Leave it to sit for at least 20 minutes.
- Scrub and wipe. Use a non-scratch scourer to work through the loosened grime, then wipe everything down with a damp cloth. You may need to go over stubborn spots twice.
- Clean the door glass. The inside of the oven door collects splatter every time you cook. Spray it with your cleaner and wipe it until it’s clear. If your oven has a removable inner glass panel, take it out and clean both sides.
- Scrub the racks. After soaking, use a scourer or old toothbrush to remove the remaining residue, rinse, dry, and slide them back in.
Vacmate Tip: On some oven models, the front glass panel can’t be safely removed for cleaning between the panes. Forcing it risks cracking or permanently damaging the door. If you can see grime trapped between the glass layers, that’s one to leave to our Vacmate professionals.
Rangehood and Filters: The Most Overlooked Spot in the Kitchen
The rangehood filter is, hands down, the thing most people forget to clean. It sits above the cooktop quietly collecting grease every single time you cook, and after a few months, it can be completely saturated.
A clogged filter doesn’t just look unpleasant – it stops working properly, which means grease and steam stay in your kitchen instead of being extracted. That greasy film on your cupboards near the stove? A blocked rangehood is often the culprit.
- Remove the filter. Most rangehood filters slide or clip out from the underside of the hood. Check your model’s manual if you’re unsure.
- Soak it. Fill your sink or a large tub with very hot water, a good squeeze of dish soap, and half a cup of baking soda. Submerge the filter and let it soak for 15 to 20 minutes. You’ll see the grease start to lift almost immediately.
- Scrub gently. Use a soft brush (an old toothbrush works well) to work through the mesh. Avoid anything too abrasive; you don’t want to damage the filter material.
- Clean the hood itself. While the filter soaks, wipe down the exterior and underside of the rangehood with a degreasing spray. The underside especially tends to collect a sticky layer of grease.
- Dry and replace. Let the filter air dry completely before clicking it back into place.
Vacmate Tip: If you cook most nights, clean your rangehood filter every eight to ten weeks. If you do a lot of frying or wok cooking, bump that up to every four to six weeks. A clean filter makes a noticeable difference to air quality in your kitchen.
How to Deep Clean Your Fridge (Inside and Out)
Fridges tend to be cleaned reactively, so when something spills, you wipe it up. But a proper deep clean means pulling everything out and dealing with the shelves, drawers, seals, and exterior in one go.
- Empty your fridge completely. Check expiry dates as you go and throw out anything past its best. Group items on the bench so you can put them back in an organised way.
- Remove shelves and drawers. Wash them in warm, soapy water in the sink. For stuck-on spills, let them soak for ten minutes first.
- Wipe the interior. Use a solution of warm water and bicarb soda (about two tablespoons per litre) to wipe down all the interior walls, the ceiling, and the fridge floor. This cleans without leaving a chemical smell near your food.
- Clean the door seals. The rubber seals around the fridge door trap crumbs, moisture, and mould. Use an old toothbrush dipped in a bicarb solution to get into the folds. This is one of the most common grease removal tips our cleaners recommend, as the seals collect more grime than most people realise.
- Wipe down the exterior. For stainless steel, wipe in the direction of the grain with a microfibre cloth. A small amount of baby oil on the cloth gives it a streak-free finish.
- Don’t forget the top. Wipe the top of the fridge with a degreasing spray every time you deep clean. It’s a little-known magnet for greasy dust.
Vacmate Tip: Place a shallow dish of baking soda on one of the shelves after cleaning. It absorbs odours between deep cleans and keeps everything smelling fresh.
Benchtops and Splashback: Getting Rid of Hidden Grease
Benchtops get wiped daily in most kitchens, but an in-depth clean goes further, especially around the areas near the stove where grease splatters settle.
- Clear everything off the benchtop. Appliances, canisters, fruit bowls, everything. You’d be surprised how much grime collects underneath and behind items that sit in the same spot for months.
- Clean based on the material. Stone benchtops (like Caesarstone or granite) do best with a pH-neutral, eco-friendly product. Avoid vinegar or citrus-based products on the stone, as they can etch the surface over time. Laminate benchtops are more forgiving; a general-purpose spray works well.
- Tackle the splashback. The full splashback, not just the section directly behind the stove. Grease splatters travel further than you’d think, and a thin film can build up across tiles or glass over weeks. Spray with a degreaser and wipe in sections.
- Pay attention to grout lines. If your splashback is tiled, grout lines are where grease and discolouration accumulate. An old toothbrush with a paste of bicarb and water is one of the best grease removal tips for this. Just work it into the grout, leave for five minutes, then wipe clean.
Sink, Tapware, and Drain: The Detail That Makes the Difference
Telling you to clean your sink might seem like a basic kitchen cleaning tip, but there’s a difference between rinsing it out after dishes and actually deep cleaning it.
- Scrub the basin. Use a non-scratch cream cleanser or a paste of bicarb soda. Work it across the entire basin, including the area around the drain and the overflow hole (the small opening near the top of the sink).
- Descale the tapware. Limescale builds up around the base of taps and on the spout. Soak a cloth in white vinegar and wrap it around the affected area for 15 minutes, then scrub gently. For chrome or stainless taps, buff dry with a microfibre cloth for a polished finish.
- Clean the drain. Pour half a cup of bicarb soda down the drain followed by half a cup of white vinegar. Let it fizz for ten minutes, then flush with boiling water. This breaks down grease and food build-up inside the drain without harsh chemicals.
- Dry the sink. This is a small thing, but it makes a big difference. Drying your sink after cleaning prevents water spots and keeps it looking clean for longer.
The “Forgotten Zones”: Cupboard Tops, Kickboards, and Behind Appliances
These are the areas that separate a regular once-over from a professional kitchen clean. They’re not visible at eye level, so they tend to be ignored, but they accumulate a surprising amount of grime.
- Top of cupboards: If your kitchen cupboards don’t extend all the way to the ceiling, the tops collect a sticky layer of greasy dust. Spray with a degreaser and wipe down. Laying a sheet of baking paper or newspaper on top after cleaning makes the next round much easier, just peel it off and replace it.
- Kickboards: The panels at the base of your cabinets catch dust, crumbs, and liquid spills that drip down the front of the cupboards. Wipe them with a damp cloth and a general-purpose cleaner.
- Behind and under appliances: Pull out the microwave, toaster, kettle, and any other benchtop appliances. Clean the wall and bench surface behind them. If you can safely move the fridge, vacuum or wipe behind and beneath it as well.

When to DIY and When to Call a Vacmate Professional
Like general house cleaning, there are lots of kitchen tasks that are perfectly manageable at home. Others are more time-consuming, require specific products, or involve hard-to-reach areas – that’s where a professional team will get a better result.
Here’s a general guide:
| Task | DIY-Friendly? | Better with a Pro? | Why? |
| Wiping down benchtops and splashback | ✓ | Quick job with the right cleaning solution | |
| Cleaning fridge interior | ✓ | Straightforward with bicarb solution | |
| Scrubbing the sink and tapware | ✓ | Regular maintenance is easy | |
| Deep cleaning the oven interior | ✓ (with patience) | ✓ | Heavy build-up can be very stubborn |
| Cleaning between the oven glass panes | ✓ | Risk of damage if done incorrectly | |
| Degreasing rangehood filters | ✓ | Soaking does most of the work | |
| Cleaning behind fridge/oven | ✓ | Requires moving heavy appliances | |
| Full kitchen deep clean (all zones) | ✓ | Time-intensive; pros have tools, products, and the know-how |
If your kitchen hasn’t had a proper deep clean in six months or more, or if you’re short on time and want a thorough result, a professional clean can reset the space completely. From there, maintaining it yourself between appointments is much more realistic.
A Simple Kitchen Cleaning Schedule That Actually Works
The easiest way to keep your kitchen in great shape long-term is to layer your cleaning across daily, weekly, and monthly tasks. That way, the deep clean never feels like a huge project.
- Daily: Wipe benchtops, wash dishes, clean the stovetop after cooking, and give the sink a quick rinse.
- Weekly: Clean the splashback, wipe cabinet handles and high-touch surfaces, mop the floor, and give the sink a proper scrub.
- Monthly: Clean the dishwasher filter, wipe down the outside of the fridge, and check the rangehood filter.
- Every 2–3 months: Deep clean the oven, fridge interior, and rangehood. Wipe cupboard tops, kickboards, and behind appliances.
Breaking it up like this means you’re never facing a full kitchen overhaul in one go. It’s the same approach our professional cleaning team recommends to clients after a deep clean: to maintain the result with small, regular cleans.
Need a Hand? Give Vacmate a Call
If you’d rather skip the scrubbing and have your kitchen deep cleaned by an experienced team, it’s time to call in our Vacmate experts.
Vacmate covers every zone listed in this guide as part of our professional kitchen cleaning service, including oven, rangehood, fridge, splashback, cupboard tops, kickboards, and more. We service homes across Geelong, the Bellarine Peninsula, and the Surf Coast, and every job is completed against a detailed checklist so nothing gets missed.
Get in touch with the Vacmate team on (03) 7050 2742 or at info@vacmate.com.au to book or ask any questions. We’re happy to chat through what’s involved before you commit.